Are Programs and Menus Worth Budgeting For?

PROGRAMS

The end of a wedding ceremony: the newlyweds joyfully walk back up the aisle and their guests follow suit, leaving behind a scattering of papers. No, not confetti that’s been thrown onto the happy couple, but programs, left behind at almost every seat. While helpful during the ceremony, few people take programs home as keepsakes after the wedding. So, are they worth the thirty-ish minutes they’re actually used for?

Let’s keep it quick!

PROS

  • Programs allow guests to familiarize themselves with the members of the wedding party, and to understand everyone’s relation to the couple.

  • They act as a roadmap for guests to know approximately how much time remains in the ceremony.

  • For religious ceremonies, programs enlighten guests on the significance of any rituals they might not be familiar with, and where group participation is welcome (songs or prayers).

  • They’re a nice keepsake for parents and grandparents.

CONS

  • Programs are used for approximately 20 - 60 minutes, depending on how long your ceremony is. Then, they’re usually thrown away.

  • If it’s hot, programs might act as a distraction. If your wedding day tends to be a warm one, just know you may find yourself looking out onto a sea of paper fans waving as guests attempt to cool themselves.

While programs add a nice touch and are an opportunity to tie the ceremony to the invitation suite and other day-of papers, they’re a good item to cut if they’re not a “must have” or if you’re trying to make some room in your ceremony budget for, say, a cellist.

MENUS

Reception tables look absolutely fabulous with a menu at each place setting, but the cost can quickly add up at a 200+ guest celebration. So, is the added cost worth it?

Let’s keep it quick!

PROS

  • Make your menus 2-in-1 by printing your guest names at the top. Now they’ll act as place cards, too!

  • If the dining experience is family-style, menus will be helpful for guests to know what the options are.

  • Menus tie the tablescape together beautifully and add to the “branding” of your celebration.

CONS

  • Menus are rather unnecessary if guests have pre-selected their meals. They already know what they’ll be served!

  • Like programs, the cost per person can really add up, especially with higher guest counts.

Tip: You love the way a reception table looks in photos with a menu at each place setting, but you don’t have the budget for one per guest? Have your stationer print one for however many reception tables you have. Your planner or photographer can lay them out at each place setting on the table the photographer will take photos of before guests arrive, and after, the menus can be rearranged for the reception so there’s one at every table.

Bonus: Print your table number at the top of the menus, or on the reverse to also act as a table card.

How Photoshop Has Changed My Business

For many years, I only used Apple Pages to create wedding invitations for clients- I know, very prehistoric of me! I was absolutely overwhelmed by the time and money it seemed like it would cost me to deal with Photoshop and Illustrator.

Because of my limited computer skills, I was having to paint all of my custom designs as one painting- for example, with a watercolor crest, everything was painted together as a completed original design.

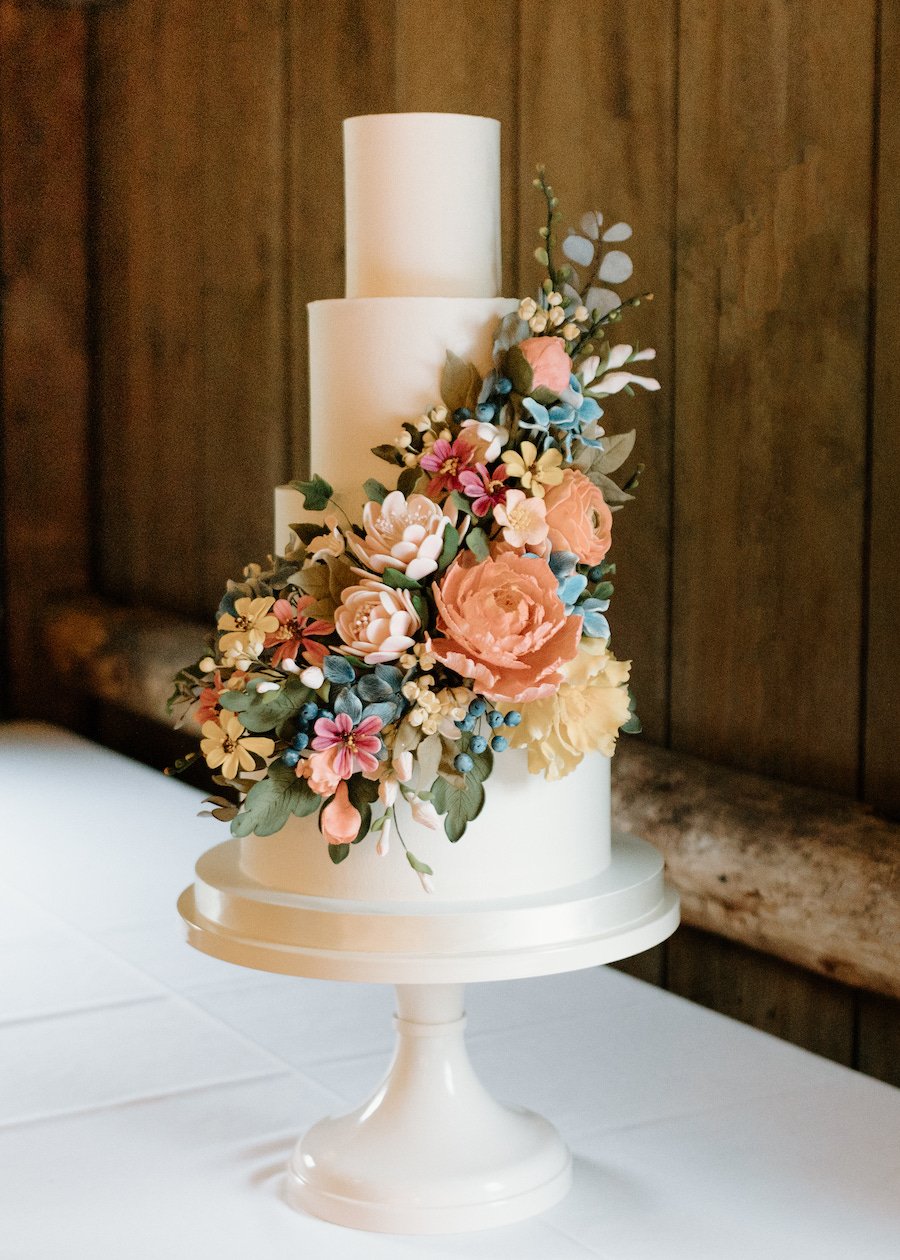
Unfortunately, one of the problems with this set up was that everything had to be painted absolutely tiiiiiny, so that there wasn’t much ability to add details. The other issue I was running into were client revision requests, as small tweaks would often require entire re-paints of a design.

Finally, I decided it was time to get on the Photoshop bandwagon. Photoshop allows me to give watercolor scans transparent backgrounds, which is crucial in order to be able to overlay one watercolor over another. Now, I can paint each item separately, which allows me to paint bigger (more detail). Look at the improvement!!

Creating a New Invitation Suite

The most common follow up question people ask me after inquiring into what I do is “so do you hand paint each invitation?” Could you imagine, hand painting 100+ invitations for a single order!

My three-step process is quite simple.

One: Watercolor the designs

Once painted, I scan each watercolor. You can see that there are a few blips that need to be cleaned up, mainly dust from my scanner. I also make the background transparent to get rid of the watercolor paper texture.

Two: Clean up the watercolors

I upload each scan to photoshop, where I remove impurities/dust/etc. and can fix any colors digitally.

Three: Format the design layouts

Once the watercolors have been cleaned up, I’m able to play around with the layouts until I’m satisfied with how everything looks.

And boom! A new invitation suite is created!